
Saturday, September 30, 2017
ATTN: Guild Officers
Please do not trigger a Pit Raid until we get everyone on board with the Zero Dmg Rule. When I'm confident we're good to go, I'll post a green light here. For now, let's sit on G and wait for O. Thanks everyone.

Nightsisters
If you aren't already aware, the Daily Login character for October is Nightsister Talia. Which means that there's probably a NS rework in our fairly near future. If so, I expect the release of new characters like Mother Talzin, as well as a serious bump to the Attacks & Abilities of all the existing NS crew. Who knows, perhaps a few will gain Zeta Abilities. When I hear more news about this, I'll post it here!
Pit Raids, Part 2
Folks, it has been pointed out to me that how to follow the Zero Damage Rule that most SWGoH guilds implement requires just a bit of explaining. Rather than bore you all with a longwinded description, you'll notice a new section in our sidebar titled Pit Raid Overview. At the bottom of the section is a link to a very informative YouTube video made by another guild. Please watch this video, since it offers a detailed and on-point explanation of the Zero Damage Rule. Again, if you have any questions, feel free to contact me. Thanks, everyone!
Friday, September 29, 2017
Pit Raids
Our recent merger has put us in a new, interesting position. Namely, we can now absolutely run straight through a Tier V Pit Raid in a few hours thanks to a boosted number of higher level players. This is a bit problematic, since we generally run those Tier V Pits for the benefit of members who are lower in level.

In light of this, I'd like to implement what most guilds call a 24 Hour Zero Damage rule. Here's how it works. The principle is pretty simple. Players can only enter the Pit Raid 24 hrs after it has been initiated. Many guilds do this to make sure every player gets a chance to participate in the raid.
I'd like to implement this rule for Tier V and VI. Moreover, I'd also like to alternate between these two tiers regularly. First we run V, then VI, then V, then VI, and so forth. This way, every player who participates will receive useful rewards across the board.
So, heads up to both Officers and Members! If you have any questions at all, feel free to ask in GC, email, or in the comments below.
Wednesday, September 27, 2017
Modding Fulcrum
Most guild members know that SWGoH has an interesting feature called Mods, which, like various Gear pieces, enhance any given hero's stats. What's not as obvious, though, is how different mods can work together with different heroes. Moreover, not all mods are created equal. Even those from the same mod family and with the same rating can vastly differ in the stats that they boost. If you'd like to read up on mods and how they can improve your heroes, there's a super article at Gaming-Fans. In this post, then, I'd like to share how I've modded a new hero that I'm working on, Ahsoka Tano (Fulcrum), who has proved an excellent addition to my Rebel group. First, let's take a quick look at Fulcrum as she currently stands:

As you can see, I'm still grinding shards for an elusive 6th star and, moreover, I'm fairly close to ratcheting her up to Gear Lvl IX. I've used Fulcrum in GW for a little while now, which was necessary to feel out her strengths and weaknesses. Which leads me to my first tip.
Before modding up a hero, run them in either a LS or DS mission where they wont get immediately overpowered. Do this several times. Get used to not only how their Attacks & Abilities function, but also how that hero could synergize with other heroes in a given squad. Doing this, I found that Fulcrum pairs well with Princess Leia when Admiral Ackbar is in the squad Leader position. This is because Fulcrum and Leia have the ability to Stealth. When they do, Ackbar automatically calls an ally to assist. You gain Stealth without losing an attack that you otherwise would, in other words.
I'll detail Fulcrum's Attacks & Abilities in another post, but, suffice it to say, getting a sense of how your hero functions in battle will help you make mod choices. You'll notice a Stats button to the left of Fulcrum's shard count. Tap on it and a Stats screen will appear, which lists Primary Attributes, General Attributes, Physical Offense, Physical Survivability, Special Offense, and Special Survivability. These are the characteristics that you're modding. I've modded my Leia to have a whopping 191 Speed, which practically guarantees her a first move at the beginning of a new encounter. Since her first move is to invoke Stealth, I thought it wise to do similarly with Fulcrum, whose Speed I modded up to a very healthy 180. In the first two moves of a given encounter, then, Fulcrum invokes Stealth immediately after Leia, while, at the same time, Ackbar calls for attacks to assist both. Before we look at the specific mods I've chosen for Fulcrum, I've like to give a quick overview of mods and their terminologies.
Combing mods will give you Set Bonuses, which max at 10% per set. Moreover, there are 8 different Mod Types: Health, Defense, Critical Damage, Critical Chance, Tenacity, Offense, Potency, and Speed. Offense and Critical Damage require 4 mods to make a set, whereas all the other types only require 2. Also worth noting are the names to those 6 differently shaped mod slots: Transmitter (Square), Receiver (Arrow), Holo-Array (Triangle), Processor (Diamond), Data-Bus (Circle), and Multiplexer (Cross). At the outset, you're required to fight your way through Mod Battles, which will eventually unlock Mod Challenges. These Challenges are the best way to earn excellent mods. But that requires fairly powerful squads: Health (All), Defense (Jedi), Critical Damage (Jawas), Critical Chance (Scoundrels), Tenacity (Rebels), Offense (First Order), Potency (Empire), and Speed (Resistance). As with all things SWGoH, the Challenges are tiered. The higher the tier, the better the mods that drop.
So, let's take a closer look at what I've done with Fulcrum:

This is what she looked like earlier today, before I decided on what kind of Multiplexer to use. What should immediately stand out, though, is that I've used Health mods exclusively. When I first began to use Fulcrum unmodded at 4 Stars, I realized that, if she was going to survive in GW against 7 Star, Lvl 85 opponents, then I'd best focus exclusively on Health set bonuses. But, as I noted earlier, not all mods of the same Type are on a par. Let's look at my choice of Multiplexer:
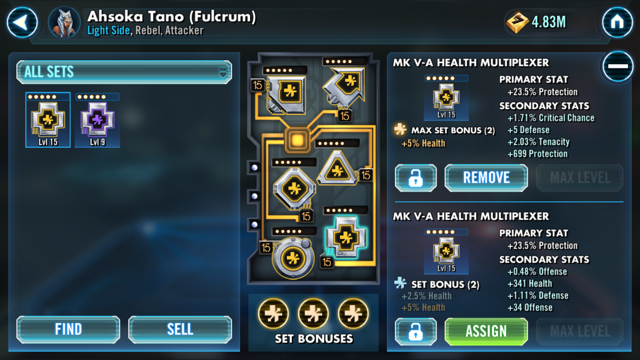
To make things even more complex, EA developed Mod Types to also have different Primary and Secondary Stats. I had a choice to use either 1 of 2 MK V-A Health Multiplexers, but I chose the top one for several reasons. While both give a +23.5% Protection bonus, the one I chose also gives a flat +699 Protection. That's a significant Protection increase. Also, the Critical Chance bonus improves an already devastating Special Ability called Whirlwind. I also liked the Tenacity and Defense bumps over a bit more Health and Offense. I did say, though, that I wanted to increase her Health. So, I made sure that I gave her a Data-Bus mod that offered a boost to Health for its Primary Stat:

Choosing between these two mods was a no-brainer. The Primary Stat percentage boost to Health is the same, but the Protection bump at a flat +1738 is pure gold. Combined with that +1.79% Protection, it really outshines the alternative. And, remember when I wanted to increase Fulcrum's speed so that my two Stealth heroes were also very fast? Well, take a look at her Receiver mod:

Yep, you're reading that right. At an incredible +30 Speed, this mod's a keeper. While the Secondary Stats are underwhelming, this mod gives me a Health set bonus in addition to a massive Speed increase that puts Fulcrum almost on a par with Leia. As I collect mods in the future, I'll keep an eye out for a Health Receiver that has a comparable Primary Stat for Speed, but also gives even more useful Secondary Stats.
So, the general takeaway from all this is that no two mods are really created equal. Moreover, some mods will help you truly customize your hero, while others not so much. The Mod Types are important since they do give Set Bonuses, but you'll also want to pay particular attention to the different Primary and Secondary Stats that each mod offers. When Fulcrum is finally at 7 Stars, I'll consider installing different mod sets, specifically Critical Chance, without hindering her Protection. Why? Well, Fulcrum not only gains 40% Protection Up (maxed) for 2 Turns with her Balanced Strike (Basic) attack, but she also grants the same to a random ally who doesn't have it. The higher her Protection, the more 40% means! But I'll get into her specifics in another post. For now, I hope this helps you sort what kind of mods you might want to use for different heroes, and why you might want to use them.

As you can see, I'm still grinding shards for an elusive 6th star and, moreover, I'm fairly close to ratcheting her up to Gear Lvl IX. I've used Fulcrum in GW for a little while now, which was necessary to feel out her strengths and weaknesses. Which leads me to my first tip.
Before modding up a hero, run them in either a LS or DS mission where they wont get immediately overpowered. Do this several times. Get used to not only how their Attacks & Abilities function, but also how that hero could synergize with other heroes in a given squad. Doing this, I found that Fulcrum pairs well with Princess Leia when Admiral Ackbar is in the squad Leader position. This is because Fulcrum and Leia have the ability to Stealth. When they do, Ackbar automatically calls an ally to assist. You gain Stealth without losing an attack that you otherwise would, in other words.
I'll detail Fulcrum's Attacks & Abilities in another post, but, suffice it to say, getting a sense of how your hero functions in battle will help you make mod choices. You'll notice a Stats button to the left of Fulcrum's shard count. Tap on it and a Stats screen will appear, which lists Primary Attributes, General Attributes, Physical Offense, Physical Survivability, Special Offense, and Special Survivability. These are the characteristics that you're modding. I've modded my Leia to have a whopping 191 Speed, which practically guarantees her a first move at the beginning of a new encounter. Since her first move is to invoke Stealth, I thought it wise to do similarly with Fulcrum, whose Speed I modded up to a very healthy 180. In the first two moves of a given encounter, then, Fulcrum invokes Stealth immediately after Leia, while, at the same time, Ackbar calls for attacks to assist both. Before we look at the specific mods I've chosen for Fulcrum, I've like to give a quick overview of mods and their terminologies.
Combing mods will give you Set Bonuses, which max at 10% per set. Moreover, there are 8 different Mod Types: Health, Defense, Critical Damage, Critical Chance, Tenacity, Offense, Potency, and Speed. Offense and Critical Damage require 4 mods to make a set, whereas all the other types only require 2. Also worth noting are the names to those 6 differently shaped mod slots: Transmitter (Square), Receiver (Arrow), Holo-Array (Triangle), Processor (Diamond), Data-Bus (Circle), and Multiplexer (Cross). At the outset, you're required to fight your way through Mod Battles, which will eventually unlock Mod Challenges. These Challenges are the best way to earn excellent mods. But that requires fairly powerful squads: Health (All), Defense (Jedi), Critical Damage (Jawas), Critical Chance (Scoundrels), Tenacity (Rebels), Offense (First Order), Potency (Empire), and Speed (Resistance). As with all things SWGoH, the Challenges are tiered. The higher the tier, the better the mods that drop.
So, let's take a closer look at what I've done with Fulcrum:

This is what she looked like earlier today, before I decided on what kind of Multiplexer to use. What should immediately stand out, though, is that I've used Health mods exclusively. When I first began to use Fulcrum unmodded at 4 Stars, I realized that, if she was going to survive in GW against 7 Star, Lvl 85 opponents, then I'd best focus exclusively on Health set bonuses. But, as I noted earlier, not all mods of the same Type are on a par. Let's look at my choice of Multiplexer:

To make things even more complex, EA developed Mod Types to also have different Primary and Secondary Stats. I had a choice to use either 1 of 2 MK V-A Health Multiplexers, but I chose the top one for several reasons. While both give a +23.5% Protection bonus, the one I chose also gives a flat +699 Protection. That's a significant Protection increase. Also, the Critical Chance bonus improves an already devastating Special Ability called Whirlwind. I also liked the Tenacity and Defense bumps over a bit more Health and Offense. I did say, though, that I wanted to increase her Health. So, I made sure that I gave her a Data-Bus mod that offered a boost to Health for its Primary Stat:

Choosing between these two mods was a no-brainer. The Primary Stat percentage boost to Health is the same, but the Protection bump at a flat +1738 is pure gold. Combined with that +1.79% Protection, it really outshines the alternative. And, remember when I wanted to increase Fulcrum's speed so that my two Stealth heroes were also very fast? Well, take a look at her Receiver mod:

Yep, you're reading that right. At an incredible +30 Speed, this mod's a keeper. While the Secondary Stats are underwhelming, this mod gives me a Health set bonus in addition to a massive Speed increase that puts Fulcrum almost on a par with Leia. As I collect mods in the future, I'll keep an eye out for a Health Receiver that has a comparable Primary Stat for Speed, but also gives even more useful Secondary Stats.
So, the general takeaway from all this is that no two mods are really created equal. Moreover, some mods will help you truly customize your hero, while others not so much. The Mod Types are important since they do give Set Bonuses, but you'll also want to pay particular attention to the different Primary and Secondary Stats that each mod offers. When Fulcrum is finally at 7 Stars, I'll consider installing different mod sets, specifically Critical Chance, without hindering her Protection. Why? Well, Fulcrum not only gains 40% Protection Up (maxed) for 2 Turns with her Balanced Strike (Basic) attack, but she also grants the same to a random ally who doesn't have it. The higher her Protection, the more 40% means! But I'll get into her specifics in another post. For now, I hope this helps you sort what kind of mods you might want to use for different heroes, and why you might want to use them.
Another Week, Another TB
Congratulations on a fairly well done Territory Battle, everyone, despite a few coordination snafus. We'll clear those up before the next TB, I'm sure. The excellent news is that, as some of you may have noticed, EA bumped up the rewards for a 10 Star rating, adding a not-so-shabby Prize Box to the Guild Event Tokens package. Enjoy the spoils, heroes.
I'll post more soon on what moves we can make in preparation for the next TB. I'll also post updates on Pit Raids and the Tank Takedown, as well as a breakdown of my new favorite hero, Fulcrum. And for some of the lower level folks, I'll post on Mods in the future, which can give excellent advantages to your squads.
I'll post more soon on what moves we can make in preparation for the next TB. I'll also post updates on Pit Raids and the Tank Takedown, as well as a breakdown of my new favorite hero, Fulcrum. And for some of the lower level folks, I'll post on Mods in the future, which can give excellent advantages to your squads.
Tuesday, September 26, 2017
TB Update: Final Phase
While we've done well so far, it looks like we've finally hit our wall. Mathematically speaking, it looks difficult if not impossible to push further into the map. If we focus our efforts on the Snowfields grid, perhaps we can make a dent that makes a difference!
Subscribe to:
Posts (Atom)