
Saturday, September 30, 2017
ATTN: Guild Officers
Please do not trigger a Pit Raid until we get everyone on board with the Zero Dmg Rule. When I'm confident we're good to go, I'll post a green light here. For now, let's sit on G and wait for O. Thanks everyone.
Nightsisters
If you aren't already aware, the Daily Login character for October is Nightsister Talia. Which means that there's probably a NS rework in our fairly near future. If so, I expect the release of new characters like Mother Talzin, as well as a serious bump to the Attacks & Abilities of all the existing NS crew. Who knows, perhaps a few will gain Zeta Abilities. When I hear more news about this, I'll post it here!
Pit Raids, Part 2
Folks, it has been pointed out to me that how to follow the Zero Damage Rule that most SWGoH guilds implement requires just a bit of explaining. Rather than bore you all with a longwinded description, you'll notice a new section in our sidebar titled Pit Raid Overview. At the bottom of the section is a link to a very informative YouTube video made by another guild. Please watch this video, since it offers a detailed and on-point explanation of the Zero Damage Rule. Again, if you have any questions, feel free to contact me. Thanks, everyone!
Friday, September 29, 2017
Pit Raids
Our recent merger has put us in a new, interesting position. Namely, we can now absolutely run straight through a Tier V Pit Raid in a few hours thanks to a boosted number of higher level players. This is a bit problematic, since we generally run those Tier V Pits for the benefit of members who are lower in level.

In light of this, I'd like to implement what most guilds call a 24 Hour Zero Damage rule. Here's how it works. The principle is pretty simple. Players can only enter the Pit Raid 24 hrs after it has been initiated. Many guilds do this to make sure every player gets a chance to participate in the raid.
I'd like to implement this rule for Tier V and VI. Moreover, I'd also like to alternate between these two tiers regularly. First we run V, then VI, then V, then VI, and so forth. This way, every player who participates will receive useful rewards across the board.
So, heads up to both Officers and Members! If you have any questions at all, feel free to ask in GC, email, or in the comments below.
Wednesday, September 27, 2017
Modding Fulcrum
Most guild members know that SWGoH has an interesting feature called Mods, which, like various Gear pieces, enhance any given hero's stats. What's not as obvious, though, is how different mods can work together with different heroes. Moreover, not all mods are created equal. Even those from the same mod family and with the same rating can vastly differ in the stats that they boost. If you'd like to read up on mods and how they can improve your heroes, there's a super article at Gaming-Fans. In this post, then, I'd like to share how I've modded a new hero that I'm working on, Ahsoka Tano (Fulcrum), who has proved an excellent addition to my Rebel group. First, let's take a quick look at Fulcrum as she currently stands:

As you can see, I'm still grinding shards for an elusive 6th star and, moreover, I'm fairly close to ratcheting her up to Gear Lvl IX. I've used Fulcrum in GW for a little while now, which was necessary to feel out her strengths and weaknesses. Which leads me to my first tip.
Before modding up a hero, run them in either a LS or DS mission where they wont get immediately overpowered. Do this several times. Get used to not only how their Attacks & Abilities function, but also how that hero could synergize with other heroes in a given squad. Doing this, I found that Fulcrum pairs well with Princess Leia when Admiral Ackbar is in the squad Leader position. This is because Fulcrum and Leia have the ability to Stealth. When they do, Ackbar automatically calls an ally to assist. You gain Stealth without losing an attack that you otherwise would, in other words.
I'll detail Fulcrum's Attacks & Abilities in another post, but, suffice it to say, getting a sense of how your hero functions in battle will help you make mod choices. You'll notice a Stats button to the left of Fulcrum's shard count. Tap on it and a Stats screen will appear, which lists Primary Attributes, General Attributes, Physical Offense, Physical Survivability, Special Offense, and Special Survivability. These are the characteristics that you're modding. I've modded my Leia to have a whopping 191 Speed, which practically guarantees her a first move at the beginning of a new encounter. Since her first move is to invoke Stealth, I thought it wise to do similarly with Fulcrum, whose Speed I modded up to a very healthy 180. In the first two moves of a given encounter, then, Fulcrum invokes Stealth immediately after Leia, while, at the same time, Ackbar calls for attacks to assist both. Before we look at the specific mods I've chosen for Fulcrum, I've like to give a quick overview of mods and their terminologies.
Combing mods will give you Set Bonuses, which max at 10% per set. Moreover, there are 8 different Mod Types: Health, Defense, Critical Damage, Critical Chance, Tenacity, Offense, Potency, and Speed. Offense and Critical Damage require 4 mods to make a set, whereas all the other types only require 2. Also worth noting are the names to those 6 differently shaped mod slots: Transmitter (Square), Receiver (Arrow), Holo-Array (Triangle), Processor (Diamond), Data-Bus (Circle), and Multiplexer (Cross). At the outset, you're required to fight your way through Mod Battles, which will eventually unlock Mod Challenges. These Challenges are the best way to earn excellent mods. But that requires fairly powerful squads: Health (All), Defense (Jedi), Critical Damage (Jawas), Critical Chance (Scoundrels), Tenacity (Rebels), Offense (First Order), Potency (Empire), and Speed (Resistance). As with all things SWGoH, the Challenges are tiered. The higher the tier, the better the mods that drop.
So, let's take a closer look at what I've done with Fulcrum:

This is what she looked like earlier today, before I decided on what kind of Multiplexer to use. What should immediately stand out, though, is that I've used Health mods exclusively. When I first began to use Fulcrum unmodded at 4 Stars, I realized that, if she was going to survive in GW against 7 Star, Lvl 85 opponents, then I'd best focus exclusively on Health set bonuses. But, as I noted earlier, not all mods of the same Type are on a par. Let's look at my choice of Multiplexer:
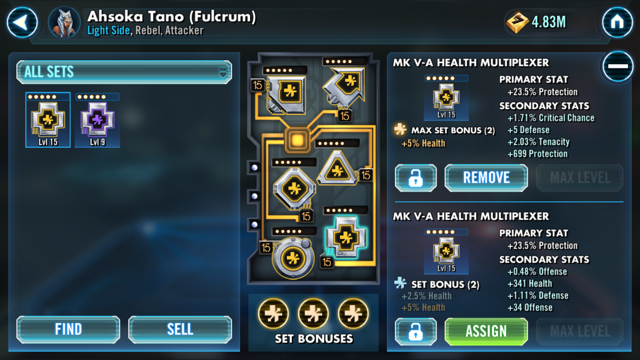
To make things even more complex, EA developed Mod Types to also have different Primary and Secondary Stats. I had a choice to use either 1 of 2 MK V-A Health Multiplexers, but I chose the top one for several reasons. While both give a +23.5% Protection bonus, the one I chose also gives a flat +699 Protection. That's a significant Protection increase. Also, the Critical Chance bonus improves an already devastating Special Ability called Whirlwind. I also liked the Tenacity and Defense bumps over a bit more Health and Offense. I did say, though, that I wanted to increase her Health. So, I made sure that I gave her a Data-Bus mod that offered a boost to Health for its Primary Stat:

Choosing between these two mods was a no-brainer. The Primary Stat percentage boost to Health is the same, but the Protection bump at a flat +1738 is pure gold. Combined with that +1.79% Protection, it really outshines the alternative. And, remember when I wanted to increase Fulcrum's speed so that my two Stealth heroes were also very fast? Well, take a look at her Receiver mod:

Yep, you're reading that right. At an incredible +30 Speed, this mod's a keeper. While the Secondary Stats are underwhelming, this mod gives me a Health set bonus in addition to a massive Speed increase that puts Fulcrum almost on a par with Leia. As I collect mods in the future, I'll keep an eye out for a Health Receiver that has a comparable Primary Stat for Speed, but also gives even more useful Secondary Stats.
So, the general takeaway from all this is that no two mods are really created equal. Moreover, some mods will help you truly customize your hero, while others not so much. The Mod Types are important since they do give Set Bonuses, but you'll also want to pay particular attention to the different Primary and Secondary Stats that each mod offers. When Fulcrum is finally at 7 Stars, I'll consider installing different mod sets, specifically Critical Chance, without hindering her Protection. Why? Well, Fulcrum not only gains 40% Protection Up (maxed) for 2 Turns with her Balanced Strike (Basic) attack, but she also grants the same to a random ally who doesn't have it. The higher her Protection, the more 40% means! But I'll get into her specifics in another post. For now, I hope this helps you sort what kind of mods you might want to use for different heroes, and why you might want to use them.
Another Week, Another TB
Congratulations on a fairly well done Territory Battle, everyone, despite a few coordination snafus. We'll clear those up before the next TB, I'm sure. The excellent news is that, as some of you may have noticed, EA bumped up the rewards for a 10 Star rating, adding a not-so-shabby Prize Box to the Guild Event Tokens package. Enjoy the spoils, heroes.
I'll post more soon on what moves we can make in preparation for the next TB. I'll also post updates on Pit Raids and the Tank Takedown, as well as a breakdown of my new favorite hero, Fulcrum. And for some of the lower level folks, I'll post on Mods in the future, which can give excellent advantages to your squads.
I'll post more soon on what moves we can make in preparation for the next TB. I'll also post updates on Pit Raids and the Tank Takedown, as well as a breakdown of my new favorite hero, Fulcrum. And for some of the lower level folks, I'll post on Mods in the future, which can give excellent advantages to your squads.
Tuesday, September 26, 2017
TB Update: Final Phase
While we've done well so far, it looks like we've finally hit our wall. Mathematically speaking, it looks difficult if not impossible to push further into the map. If we focus our efforts on the Snowfields grid, perhaps we can make a dent that makes a difference!
Monday, September 25, 2017
TB Update: Phase 4 & 5
This is what the territory map looks like at the moment:

You'll note that the Phase 4 map grid to the south finally refreshed. The Phase 5 northern grid, Snowfields, requires 14,100,000 TP for 1 Star. That's a lot.
So, the general directive for this next wave is to deploy all our forces to the southern Outer Pass grid, which requires 5,220,000 TP for 1 Star. That's doable.
Of course, hit the Contested Airspace grid with everything you've got as well. When we've finally earned that 1 Star on the southern Outer Pass, we can reassess deployments.
Good hunting, everyone.
Sunday, September 24, 2017
TB Round 3 Changes
As I mentioned in a previous post, the EA devs have been tinkering with the details of Territory Battles since they launched. If you're interested in reading about the changes made to our current TB, you can find an informative article on the forums here.
TB Update: Phase 4
Well, exactly what I tried to avoid -- and what we did indeed avoid last TB -- happened this time. Namely, we failed to earn 1 star in the Phase 3 Power Generator grid to the south. Of course, this grid refreshes, and I took care of earning that star today with my alt. But, it will take another 24 hours for us to move forward into the southern Phase 4 grid.
So, hit the Phase 4 Forward Airspace full force, as per usual. And let's focus on earning that 1 Star on the northern Phase 4 Forward Trenches grid. And it will take all of our resources, so go all in.
That 5,220,000 requirement is quite a lot. Also: Do not bother with the Phase 3 grid to the south. As I said, I took care of finishing it off to earn a star. No need to waste our resources earning TP that essentially mean nothing.
As for a breakdown of what happened with Phase 3:
We failed to earn a star in the southern Rear Trenches grid on Phase 3 because a number of you didn't follow the guild directives. We absolutely wasted resources on earning Territory Points in the northern grid after we had already earned 1 Star, since reaching the TP goal for 2 Stars was mathematically impossible.

You'll note that we wound up earning 4,252,474 more Territory Points than we needed. We usually overshoot a bit, which is understandable. But this is a significant number of TP. Now, here's the southern grid:

This is the Power Generator grid to the south that I finished off with my alt earlier today. We didn't miss by much, but we did miss the goal.
If we hadn't have continued deploying troops in the northern Rear Trenches grid, we could have easily earned 1 Star in the Power Generator grid yesterday, then doubled back with remaining resources for Platoon allocations in the north.
So that's the story, everyone. We'll get it next time, I'm sure. Good hunting.
Saturday, September 23, 2017
TB Update: Phase 3
Same as Phase 2, folks. Hit the northern map grid first, earn a star, then devote all our resources to the southern grid while keeping Platoon needs in mind.
TB Update: The Battle So Far
My initial hope for this blog was fairly simple. If TBs require a multitude of players to all get on the same page, then a central resource was necessary. And I'd hoped that everyone, eventually, would develop the habit of checking in without constant reminders. It was also my hope that, once we all followed an admittedly simple strategic plan, we could then, as a group, make our strategy more complex to maximize not only our star count, but also our platoon details. Unfortunately, we're only into Phase 2 of this TB and I'm shaking my head.
I imagine that, despite my constant reminders to do so, some people haven't bothered to check in with the TB updates. (I've posted so many reminders that I'm starting to annoy even myself with them.) And I imagine this because the alternatives to not giving the blog a quick look are disheartening: Either misunderstanding the strategic directives, or flat out ignoring them. At this point, again, I'm just shaking my head.
So, for the folks who have misunderstood the general strategic plan: Do not divide your forces. Engage the northern grid in any phase with troops until we have earned a single star. If you see the northern grid starred, then engage the southern grid instead.
Again, this is as simple as I can make it. Until, that is, everyone is on board. Only then can we begin to put a finer point on the general strategy. An example of this would be to take Special Mission requirements into account, as well as sharpening up our Platoon allotments. We'll have many, many more TBs to turn our guild into a well oiled machine. But, first steps first.
The reason why I've determined a north to south movement is because, so far, the second star for the southern grids has required us to earn a lower number of Territory Points and, in turn, it's potentially easier to earn that second star. Case in point:
We are currently in Phase 2. To earn a second star on the northern Ion Cannon grid requires 19,800,000 TP. On the other hand, the southern Overlook grid requires 15,400,000 TP. This is due to the fact that the southern grids usually have 1 Special Mission and 1 Combat Mission. This means that, if you can't run the Special Mission due to requirement restrictions, you can run the Combat Mission with your best squad, ensuring that you go as deeply as possible into that battle and earn as many TP as possible. Again, a general strategy. I hope we can put a finer point on this issue of Special Missions in the future, as I mentioned earlier.
In fact, my first thought is to divide our strategies. A general strategy on the one hand and, in the future, an Officer strategy on the other. Additionally, since Ryer is more than capable of running the entire battle himself, I'd hope he would take on the duty of Platoon Updates (which he actually did today in GC) regularly, ensuring that we maximize the effectiveness of our inventories. All this I hope for the future.
But, as I stated earlier, getting everyone on board with a general strategic plan is the first step. And that has to do with everyone checking in here, as well as in GC. As my previous posts indicated, what's good in theory doesn't always work after boots hit the ground.
If you're still reading, then I ask that you not only have a little patience with this process -- and it is most definitely a process -- but also spread the word. During a TB, I'll update regularly, but I really dislike being a nag. Not my style.
Friday, September 22, 2017
TB Update
Now that we've earned 1 Star on the northern Ion Cannon grid, the amount of TP needed to earn 2 Stars is 19,800,000. It looks like we might fall short of this amount, so, again, we'll need to change up our strategy.
For the rest of Phase 2, do not deploy in the Ion Cannon grid any longer.
Rather, hit the southern Overlook grid with everything you've got. Perhaps we'll earn enough TP for 2 Stars there, but we will definitely earn 1 Star.
Hang in there folks, I'm still adjusting to the new members and the TB itself, which, by the way, the EA devs keep tinkering with. Thanks, and more soon!
TB Update: New General Strategy
As I suspected, the strategy for this next phase has changed. Now that I've been able to gauge how many Territory Points we can earn as a group, we should take a look at the numbers.
The norther Ion Cannon grid in Phase 2 maxes out at 1,900,00 TP to earn at least 1 Star. This is true for the southern map grid in this phase. And these initial TP numbers increase with the phases. For example, the initial TP for at least 1 Star on the Phase 3 grids increase to 3,510,000, Phase 4 to 5,220,000, and so forth.
In Phase 1, we earned a total of 9,449,036 TP. We should be able to earn 2 Stars on each of these Phase 2 grids. So, the new General Strategy:
Engage the northern Ion Cannon grid in Phase 2 until we've earned 2 Stars, then shift our focus to the southern grid. This means that if you see we've earned 2 Stars on the northern grid, hit the southern Overlook grid full force instead.
Good hunting!
Thursday, September 21, 2017
New Territory Battle Underway
As promised, I've been posting regularly about TBs, adding Updates as we move deeper into the map. If you missed it, my last major post discussed a general strategy to earn stars on each grid. Let's recap. Here's the map:

The point of TBs is relatively simple, i.e., earn as many stars as you can. The more stars we earn, the better our collective rewards. The deeper we move into the map, the harder earning stars becomes because doing so requires a higher number of Territory Points. Therefore, it's important that we earn as many stars as possible on the initial grids, Phases 1-3, then grind our way through as deeply as we can.
So, the deployment strategy so far:
1. General Troop Deployment Strategy: Engage the northern map grid full force until we have earned at least 1 star. Then, refocus our efforts on the southern map grid. This means that if you see the northern map grid starred, do not engage. Rather, attack the southern grid instead.
2. If we have earned at least a single star on both the northern and southern grids, deploy your forces on the map grid that has the highest number of earned Territory Points.
3. Fleet Deployment: Phase 3 begins with a Fleet grid at the northernmost point on the map. Since we are not required to divide the deployment of our fleets, everyone should deploy and attack early and often.
Please keep in mind that this is a general strategy. With all our new members in play, this strategy may change as we move deeper into the map. So, before you deploy troops, be sure to check in with the blog for any new information. I post regular updates as the TB takes shape.
Good hunting, everyone!
Wednesday, September 20, 2017
First Order of BB-Business
It's as I suspected. By now you know that earning BB-8 will require a First Order squad. If this event is anything like previous kinds, then you'll probably need 5 7* heroes to earn enough shards to make BB-8 high enough level to actually use. I don't know about you, but my FO squad consists of El Capitan Phasma and a Tie Pilot who just wants to go home.
This new content looks great, but only if you have a heavy FO squad ready to rock and, on the flip side, also have either a Resistance squad or Droid squad with which you can most effectively use BB-8. Again, this kind of event gives newer players the proverbial shaft. Personally, I think BB-8 looks like an effective Droid, but I've so so many other irons in the hero development fire that this is just kinda meh.
This new content looks great, but only if you have a heavy FO squad ready to rock and, on the flip side, also have either a Resistance squad or Droid squad with which you can most effectively use BB-8. Again, this kind of event gives newer players the proverbial shaft. Personally, I think BB-8 looks like an effective Droid, but I've so so many other irons in the hero development fire that this is just kinda meh.
Droid, please!
If you don't already know, EA is set to release everybody's favorite new droid in the Star Wars universe.
I've done some research and this little dude, pictured below, looks really useful. You can read about BB-8 and the abilities he brings to the table, including a new buff called Secret Intel, in the SWGoH forums here. There is of course an informative YouTube video as well.
In case you're wondering, there is no definitive word on what characters you'll need to earn BB-8. If I hear something, I'll be sure to post it!


Tuesday, September 19, 2017
Rebel Yell
Since the first week that I began playing this game, one thing became pretty clear. Namely, if you wanted to build an effective squad, then you had best look at the Leaderboards. Somebody else had already figured out killer hero squads. Which means, of course, that they were murdering their way through the Squad Arena and Galactic War nodes with only an occasionally felt degree of chagrin -- thanks to the occasionally merciless RNG Gods, that is. As time went on, I wondered about the wisdom of such lemming logic and, lately, I've experimented with different combinations of heroes on my own. There's nothing like good, old fashioned trial and error to learn you a lesson.
Today, I'd like to discuss a Rebel squad that I've played with lately. My main Rebel squad, which does massive damage at deadly speed, is mostly an old standby: Wedge (Leader), Biggs, Princess Leia, Chirrut, and Bridger. The later two are newer heroes who mostly replaced Ackbar, Bistan, and Scarif Rebel Pathfinder, as well as the synergistic duo of K-2SO and Andor. And these newer Rebels work quite well with the older -- and very deadly -- trifecta of Wedge, Biggs, and Leia. In short, I want to develop a different Rebel squad that is just as effective, if not more so. At the moment, I can't say that I have. I can say, however, that the one I'm currently developing has potential.
When I make my way through Galactic War nodes, the squad I begin with usually gets wiped out about halfway through, with the exception of my main stable of Rebels and, in due course, my Sith squad with Darth Nihilus in the lead. Futzing with Rebel configurations the other day, I discovered this one: Ackbar (Leader), Chirrut, Bridger, Princess Leia, Ahsoka Tano (Fulcrum).
Now, this ragtag group may not sound like much at first, but let me explain how absolutely ferocious they are. Keep in mind, these heroes are lvl 85 7*. Still under basic development, Fulcrum stands as the exception at only 5*. Their gear levels vary: Chirrut and Bridger are at 9, Ackbar and Leia are at 8, and Fulcrum is at 7. All of this is as much to say that this squad has the potential to become much, much more powerful.
There are 12 GW nodes in total. I'd first like to show you what happened with my experimental Rebel squad by the time they reached Node 10. The opponents:

This squad wasn't exactly a pushover combo, but they weren't by any means scary. Their gear levels gave me pause, though. That's a ton of protection. Here's what happened:

As you can see, my squad had taken a bit of a beating by the time they reached Node 10. What surprised me was how infrequently enemy squads had the opportunity to attack Bridger. Here's what the battlefield looked like after a full round:

I went after Rey first, then enemy Bridger. My mistake wasn't killing Yoda outright, because his next move was to steal all those buffs! Suffice it to say, Bridger's Flourish (Special) dispels all buffs on the target enemy, so I went after Ren's Retribution buff next, dispatched him within a round, then mopped up. Here's what Node 11 looked like:

These knuckleheads were WAY more formidable, as per usual with GW nodes. And while Darth Maul is notoriously squishy, if you give him room to breathe he will make any hero with a Jedi tag (which is Bridger in this case) pay dearly. So, I mauled him first. I then started in on Yoda, but Kenobi taunted, which Bridger eventually dispelled. Suffice it to say, even though it looks as though this Rebel squad is outmatched, here's what the battlefield looked like 1/2 way through round 3:

Yep, that's what happens when you leave Yoda alone for a hot minute. The little thief stole my buffs AGAIN. He never had the opportunity to clone and share them, though, because this experimental Rebel squad mopped the floor with a fresh squad of lvl 85, 7* heroes. I failed to check their gear levels before the battle, but, from the screencap, I'd say they were all at least lvl 10.
Anyway, that's mucho buffs, folks. And mucho critical damage. In my next post, I'll lay out the pros and cons of this experimental squad, as well as explain where all that green came from. Suffice it to say that this squad is an absolute buff machine, with multiple opportunities for extra attacks, retribution, and the ability to both block and dispel debuffs, as well as add health and protection bonuses. Scary.
Good hunting, everyone. More soon.
Today, I'd like to discuss a Rebel squad that I've played with lately. My main Rebel squad, which does massive damage at deadly speed, is mostly an old standby: Wedge (Leader), Biggs, Princess Leia, Chirrut, and Bridger. The later two are newer heroes who mostly replaced Ackbar, Bistan, and Scarif Rebel Pathfinder, as well as the synergistic duo of K-2SO and Andor. And these newer Rebels work quite well with the older -- and very deadly -- trifecta of Wedge, Biggs, and Leia. In short, I want to develop a different Rebel squad that is just as effective, if not more so. At the moment, I can't say that I have. I can say, however, that the one I'm currently developing has potential.
When I make my way through Galactic War nodes, the squad I begin with usually gets wiped out about halfway through, with the exception of my main stable of Rebels and, in due course, my Sith squad with Darth Nihilus in the lead. Futzing with Rebel configurations the other day, I discovered this one: Ackbar (Leader), Chirrut, Bridger, Princess Leia, Ahsoka Tano (Fulcrum).
Now, this ragtag group may not sound like much at first, but let me explain how absolutely ferocious they are. Keep in mind, these heroes are lvl 85 7*. Still under basic development, Fulcrum stands as the exception at only 5*. Their gear levels vary: Chirrut and Bridger are at 9, Ackbar and Leia are at 8, and Fulcrum is at 7. All of this is as much to say that this squad has the potential to become much, much more powerful.

This squad wasn't exactly a pushover combo, but they weren't by any means scary. Their gear levels gave me pause, though. That's a ton of protection. Here's what happened:

As you can see, my squad had taken a bit of a beating by the time they reached Node 10. What surprised me was how infrequently enemy squads had the opportunity to attack Bridger. Here's what the battlefield looked like after a full round:

I went after Rey first, then enemy Bridger. My mistake wasn't killing Yoda outright, because his next move was to steal all those buffs! Suffice it to say, Bridger's Flourish (Special) dispels all buffs on the target enemy, so I went after Ren's Retribution buff next, dispatched him within a round, then mopped up. Here's what Node 11 looked like:

These knuckleheads were WAY more formidable, as per usual with GW nodes. And while Darth Maul is notoriously squishy, if you give him room to breathe he will make any hero with a Jedi tag (which is Bridger in this case) pay dearly. So, I mauled him first. I then started in on Yoda, but Kenobi taunted, which Bridger eventually dispelled. Suffice it to say, even though it looks as though this Rebel squad is outmatched, here's what the battlefield looked like 1/2 way through round 3:

Yep, that's what happens when you leave Yoda alone for a hot minute. The little thief stole my buffs AGAIN. He never had the opportunity to clone and share them, though, because this experimental Rebel squad mopped the floor with a fresh squad of lvl 85, 7* heroes. I failed to check their gear levels before the battle, but, from the screencap, I'd say they were all at least lvl 10.
Anyway, that's mucho buffs, folks. And mucho critical damage. In my next post, I'll lay out the pros and cons of this experimental squad, as well as explain where all that green came from. Suffice it to say that this squad is an absolute buff machine, with multiple opportunities for extra attacks, retribution, and the ability to both block and dispel debuffs, as well as add health and protection bonuses. Scary.
Good hunting, everyone. More soon.
Monday, September 18, 2017
Bug Update
Well, it's fixed, apparently. And you should find 500 crystals in your inbox from EA, as per usual when something screwy happens. Don't spend'em all in one place!
Damage Bug

While working my way through GW today, I noticed that opponents were hitting awfully hard. I figured that it was just bad RNG luck. Well, as it turns out, there was -- and apparently still is -- a damage bug.
The devs note that the bug affects the Regular PVP Arena, Fleet Arena, and GW. Sooooo, you may want to give it a rest until they fix this. Two of my highest lvl DS & LS squads were pretty much murdered by the time I made it through just the 8th GW node. Hopefully they'll have this fixed soon.
You can check on the bug thread in the forums here.
You can check on the bug thread in the forums here.
Sunday, September 17, 2017
Sunday Roundup
A few quick hits for this afternoon, everyone. First, congratulations to all of you on this past Territory Battle. The general strategy of moving down the map, north to south, after securing at least 1 star on a map grid worked fairly well. We're all still getting the hang of TBs, I'm sure, but I have a good feeling about the next one.
Speaking of which, in case you missed my September 12th post, we are beginning to merge with the Alien Legion guild this weekend, the leader of which, Ryer Grogan, is a former member of Heroes Errant. So, we'll have more than a few new members fairly soon. Make them feel at home!
Also, I'll be adding a list of useful links in the sidebar today. Ever wonder *exactly* what particular buffs and debuffs do, for example? Well, check this out:

I've seen a couple of different pages with buff and debuff info online, but this one at Gaming-Fans is both updated and thorough. I definitely recommend checking it out when you have the chance. And, you may want to dig around a little while you're at it. This site is just awesome.
Finally, just a heads up about the upcoming Forest Moon Assault Battle, which requires Empire / Droid characters at lvl +78. It's a great way to pick up some extra salvage and, of course, Ewok shards. If you don't have an Empire squad, I highly recommend developing one. They're useful for not only events like this one, but also to farm Potency Mods in the Mod Challenges arena.
That's all for now, gang. Good hunting.
Saturday, September 16, 2017
Eeth Who Now?
Eeth Koth. Our own Iridonian Zabrak. A Jedi Master from Nar Shaddaa, of all places. There's so much to recommend the character of Eeth Koth in the Star Wars universe generally. He's an interesting soul. Unfortunately -- and conversely -- there isn't much to recommend him in SWGoH. As the screenshot below suggests, I gave up on Koth long ago. Both offensively and defensively, he proved himself a lightweight when compared to many of his Jedi counterparts. Now that new Jedi have been released along with a host of other powerful heroes, he does little more than collect dust near the bottom of my inventory.
Which is a shame. As I outlined in my previous post, I think the Jedi deserve a sweeping rework. But none more than our ineffectively limp friend here. So, I decided to dust this Jedi Master off, imagine an effective yet realistic redesign, and post about it. It should go without saying that the rework I imagine here is only one of many I could write about. Which is as much to say, the suggestions I discuss below are just for fun. Although, again, I do hope the SWGoH developers officially decide to make dusty heroes like Eeth Koth shine.

In any event, let's take a look under his Jedi hood, shall we? Here are the current specs on Koth's Attacks and Abilities:
Now for the Attacks and Abilities spec changes. This rework proposes that Koth shouldn't become just another Attacker who clobbers his enemies, but rather a tactically oriented Jedi Attacker who not only hits respectably hard, but also throws down a balanced variety of buffs and debuffs. And, of course, he'll still mop the deck with Droids:
If it isn't already obvious, I've paired Ima-Gun Di and Eeth Koth to work together, similar to Jedi Knight Anakin and Ahsoka Tano or, more obviously and effectively, Wedge Antilles and Biggs Darklighter. Retool Breaching Strike and these two Jedi would pack a 1-2 punch that inflicts both Offense and Defense down on any given enemy. Because I designated Koth as Attacker rather than Support, in turn I added an Attack Again feature, but only against the baddies. And, as we'll see, a guaranteed Critical Hit against Droids makes him extremely dangerous. At the moment, he's so-so even when maxed.
To polish Breaching Strike, I added an 80% chance to gain Foresight for a single turn, akin to Rey's 40% chance to gain this buff for 2 turns. To balance out the percentage difference, I doubled the chance but halved the turn length. Again, these are maxed percentages. And I added this buff chance because, as I noted earlier, Koth is practically made of glass.
I had fun with Force Push. Because the original ability mixes Stun and Ability Block, I thought it might prove interesting to focus these debuffs, inspired as I was by Director Krennic's Experimental Weaponry (Special) ability. And, again, this Special Ability offered the opportunity to develop synergies between two specific Heroes, rather than simply a random ally, which Jedi glaringly lack.
So. Let's face it. Koth's Leader Ability stinks. Sure, the 60 Defense is a good start, but it falls quite short when compared to a long, long list of other Leader Abilities. It's like the devs just threw up their hands and said, "Well, nobody's really gonna use this dude anyways. Let's just get this done and go to lunch." To make a bona fide leader out of Koth, I'd have him grant initial buffs to the whole Jedi squad. Tenacity Up has its obvious advantages at the outset of an encounter, but I also chose this because Yoda's default first move is to grant the entire squad Tenacity Up, which means that he would no longer have to do so. With just this one change, Yoda -- and, in turn, the rest of the Jedi squad -- would become far more formidable. My choice to add Evasion Up as well is less defensible, but it still makes sense to me when I consider that a hero like Cassian Andor grants his entire squad buffs at the outset of an encounter with his Unique ability, Groundwork. Evasion Up makes it less likely that the entire squad will get destroyed by AoE attacks in the first few turns. And I also thought it a nice defensive touch to have Koth automatically grant these buffs again to ailing Jedi later in the encounter. Jedi aren't generally built for speedy victories.
Now, you'll notice that I changed the name of Koth's Unique ability. Some of you may recall that, during the Clone Wars, he was taken prisoner by General Grievous. I thought to play upon that relationship with this Unique ability by doubling Koth's Critical Damage against Grievous, similar to how Darth Maul does double damage against all Jedi. With this retool, Koth would become extremely dangerous against your average Droid since Breaching Strike guarantees a Critical Hit, but when facing Grievous, however, Koth and Ima-Gun Di would form a downright deadly duo, since the latter gains +50% Critical Damage as well. And yes, these two would become very useful in the Tank Takedown arena.
So there you have it, a reworked Eeth Koth. I'd use'em a lot, that's for sure. And while I'm also sure we won't see a Jedi rework any time soon, it doesn't hurt to imagine the possibilities. I hope you enjoyed the musing. Maybe I'll write a series of these thought experiments, we'll have to see.
Which is a shame. As I outlined in my previous post, I think the Jedi deserve a sweeping rework. But none more than our ineffectively limp friend here. So, I decided to dust this Jedi Master off, imagine an effective yet realistic redesign, and post about it. It should go without saying that the rework I imagine here is only one of many I could write about. Which is as much to say, the suggestions I discuss below are just for fun. Although, again, I do hope the SWGoH developers officially decide to make dusty heroes like Eeth Koth shine.

In any event, let's take a look under his Jedi hood, shall we? Here are the current specs on Koth's Attacks and Abilities:
Breaching Strike (Basic): Deal Physical damage to target enemy with a 50% chance to inflict Defense Down for 3 turns. If the target is a Droid, this attack has a 100% chance.
Force Push (Special): Deal Special damage to target enemy with a 75% chance to Stun for 1 turn and a 100% chance to inflict Ability Block for 3 turns if the target is a Droid.
Stalwart Jedi Defense (Leader): Jedi allies gain 60 Defense.
Anti-Droid Specialist (Unique): Eeth Koth has +35% Critical Chance and +20% Critical Damage when attacking Droids.It's worth noting that Koth is listed as Support, and this is the first aspect of his character that I would overhaul. Out of the 19 Jedi heroes available, only 5 are Attackers. With a +1000 base damage to his basic attack, Breaching Strike, Koth could make a fine Attacker, on a par with Jedi Knight Anakin. And because he isn't the most robust Jedi, I would have his Health Steal max at 35%, which is above game average, but by no means jaw-droppingly unreasonable.
Now for the Attacks and Abilities spec changes. This rework proposes that Koth shouldn't become just another Attacker who clobbers his enemies, but rather a tactically oriented Jedi Attacker who not only hits respectably hard, but also throws down a balanced variety of buffs and debuffs. And, of course, he'll still mop the deck with Droids:
Breaching Strike (Basic): Deal Physical damage to target enemy. This attack inflicts Offense Down for 2 turns with an 80% chance to gain Foresight for 1 turn. If the target is Dark Side, attack again. If the target is a Droid, this attack is guaranteed a Critical Hit.
Force Push (Special): Deal special damage to target enemy and inflict a debuff (Attacker: Stun, Healer/Support: Stagger, Tank: Expose) for 2 turns. If the target is a Droid, call Ima-Gun Di to assist if he is present.
Stalwart Jedi Defense (Leader): Jedi allies gain 60 Defense, Tenacity Up and Evasion Up for 3 turns. If a Jedi ally falls below 50% health, they regain these buffs for 3 turns.
Nemesis (Unique): Eeth Koth has +25% Critical Damage when attacking Droids and +50% Critical Damage when attacking General Grievous. If Ima-Gun Di is present he also gains these bonuses.So, let me walk us through all this. First, as it currently stands Breaching Strike isn't altogether terrible. However, there are two Jedi who gain significant bonuses against Droids -- yep, you guessed it, Ima-Gun Di is the other one -- and both of these Jedi inflict Defense Down with their basic attack at 100% chance against Droids. This seemed redundant to me.
If it isn't already obvious, I've paired Ima-Gun Di and Eeth Koth to work together, similar to Jedi Knight Anakin and Ahsoka Tano or, more obviously and effectively, Wedge Antilles and Biggs Darklighter. Retool Breaching Strike and these two Jedi would pack a 1-2 punch that inflicts both Offense and Defense down on any given enemy. Because I designated Koth as Attacker rather than Support, in turn I added an Attack Again feature, but only against the baddies. And, as we'll see, a guaranteed Critical Hit against Droids makes him extremely dangerous. At the moment, he's so-so even when maxed.
To polish Breaching Strike, I added an 80% chance to gain Foresight for a single turn, akin to Rey's 40% chance to gain this buff for 2 turns. To balance out the percentage difference, I doubled the chance but halved the turn length. Again, these are maxed percentages. And I added this buff chance because, as I noted earlier, Koth is practically made of glass.
I had fun with Force Push. Because the original ability mixes Stun and Ability Block, I thought it might prove interesting to focus these debuffs, inspired as I was by Director Krennic's Experimental Weaponry (Special) ability. And, again, this Special Ability offered the opportunity to develop synergies between two specific Heroes, rather than simply a random ally, which Jedi glaringly lack.
So. Let's face it. Koth's Leader Ability stinks. Sure, the 60 Defense is a good start, but it falls quite short when compared to a long, long list of other Leader Abilities. It's like the devs just threw up their hands and said, "Well, nobody's really gonna use this dude anyways. Let's just get this done and go to lunch." To make a bona fide leader out of Koth, I'd have him grant initial buffs to the whole Jedi squad. Tenacity Up has its obvious advantages at the outset of an encounter, but I also chose this because Yoda's default first move is to grant the entire squad Tenacity Up, which means that he would no longer have to do so. With just this one change, Yoda -- and, in turn, the rest of the Jedi squad -- would become far more formidable. My choice to add Evasion Up as well is less defensible, but it still makes sense to me when I consider that a hero like Cassian Andor grants his entire squad buffs at the outset of an encounter with his Unique ability, Groundwork. Evasion Up makes it less likely that the entire squad will get destroyed by AoE attacks in the first few turns. And I also thought it a nice defensive touch to have Koth automatically grant these buffs again to ailing Jedi later in the encounter. Jedi aren't generally built for speedy victories.
Now, you'll notice that I changed the name of Koth's Unique ability. Some of you may recall that, during the Clone Wars, he was taken prisoner by General Grievous. I thought to play upon that relationship with this Unique ability by doubling Koth's Critical Damage against Grievous, similar to how Darth Maul does double damage against all Jedi. With this retool, Koth would become extremely dangerous against your average Droid since Breaching Strike guarantees a Critical Hit, but when facing Grievous, however, Koth and Ima-Gun Di would form a downright deadly duo, since the latter gains +50% Critical Damage as well. And yes, these two would become very useful in the Tank Takedown arena.
So there you have it, a reworked Eeth Koth. I'd use'em a lot, that's for sure. And while I'm also sure we won't see a Jedi rework any time soon, it doesn't hurt to imagine the possibilities. I hope you enjoyed the musing. Maybe I'll write a series of these thought experiments, we'll have to see.
Friday, September 15, 2017
TB Update
We've almost broken through the Forward Trenches of Phase 5! Once we've earned a star, we can then deploy to the Outer Pass, the southernmost grid on the map.
So, if you log on and see a star in the Forward Trenches, hit the Outer Pass as hard as you can. If not, try to finish off the Forward Trenches.
As always, go all in with your fleet. This Contested Airspace grid to the north is a real haul, requiring 18,000,000 TP for just a single star.
Good hunting, heroes.
Much Ado About Jedi
When I started this blog, I promised to someday post on more than just Territory Battles and the occasional FYI. Well, that day has come. If you're like me, you've put more than a little thought into developing effective squads for the Squad Arena, Galactic War, and so forth. I'd like to talk about Light Side squads today, specifically the Jedi. I think the Jedi need a rework across the board, akin to how Obi-Wan Kenobi (Old Ben) was recently updated.
If you haven't figured it out by now, your average squad of Jedi will get destroyed in short order by your average squad of Rebels that use the old standby trifecta of Wedge, Biggs, and Princess Leia. They won't fair much better against an Empire squad, let alone a squad of Sith that tends to use Darth Maul, who, not coincidentally, absolutely murders Jedi with double damage. At almost every turn, a squad of Jedi will drop like a brick against their given opponent. That is, if they aren't matched against these poor Nightsisters who, by the way, need a rework of their own:
There are exceptions to the general ineffectiveness of Jedi, of course. There are some very effective Jedi squads, indeed. For example, Qui-Gon Jinn's Agility Training (Leader) ability, when at Level 8 Zeta, is absolutely nasty:
Jedi in GoH were developed upon the premise of group healing and defense, while, on the other hand, Sith were developed upon the premise of individual health stealing and offense. The reasons for this are obvious, of course, and this traditional logic falls squarely in line with other Star Wars games, in fact. So, rather than suggest the reinvention of this logic, I've come up with a few ideas for a Jedi rework. These old model Jedi are fairly meh when compared to newer Heroes, such as Chirrut Imwe, Ahsoka Tano (Fulcrum), and even the often overlooked Sith Assassin. Here are three useful rework suggestions for any given Jedi taken from the Heroes I list above. As you'll note, current Jedi abilities at Level 8 tend to pale in comparison:
There is, of course, the offensive side of the sad Jedi story to consider. Most Jedi don't hit very hard, at least when compared to Rebels like Wedge Antilles or Princess Leia. The newer Jedi who are also Phoenix, such as Ezra Bridger, also significantly overshadow the damage done by a comparably leveled and modded Jedi. Granted, Bridger's ability to not only Attack Again, but also to stack his Offense up to 40% makes him a beast. But shouldn't Kit Fisto, for example, hit approximately as hard? Even Ginny McGinface could use a little bump.
But perhaps not, folks. Thinking creatively along the logic already outlined by GoH, why not add Jedi synergies across the board for calling Jedi allies to Assist with Basic Attacks, along the lines of Qui-Gon's Harmonious Assault (Special) ability? If, by default, every Jedi had a 25% chance to Assist an attacking Jedi ally, plus a 5% chance for each buff, suddenly a Jedi squad becomes potentially deadly. Or, in a different way, a rework of Ima-Gun Di's Jedi Strategist (Leader) ability could make for a formidable squad. Here it is as it stands now at Level 8:
So, in terms of Offense, why not rework a Hero like Ima-Gun Di? If I had my way, his Jedi Strategist (Leader) ability would read:
So what do you think? Do Jedi deserve a rework? Let me know in the comments below! And for my next post, I'll give an example of a fully reworked Jedi. Which one, you ask? Well, I've picked arguably the most useless Jedi around, Eeth Koth. Truth be told, his obvious ineptitudes actually make the job of reworking him much simpler! And trust me, when I'm done with Koth, he'll be a well-balanced, usefully effective member of any squad.
If you haven't figured it out by now, your average squad of Jedi will get destroyed in short order by your average squad of Rebels that use the old standby trifecta of Wedge, Biggs, and Princess Leia. They won't fair much better against an Empire squad, let alone a squad of Sith that tends to use Darth Maul, who, not coincidentally, absolutely murders Jedi with double damage. At almost every turn, a squad of Jedi will drop like a brick against their given opponent. That is, if they aren't matched against these poor Nightsisters who, by the way, need a rework of their own:
 |
| At the start of each encounter, Qui-Gon Ginny McGinface gains Gimlet Up for 3 turns |
Jedi allies have +30 Speed, gain Offense equal to 3 times their Speed, and gain Foresight for 2 turns at the start of each encounter and whenever any unit is defeated.Ahem. Add Grand Master Flash -- oops, I mean Grand Master Yoda! -- for support, along with three attackers like Kit Fisto, Luminara Unduli, and the newer Ezra Bridger, and you've got a formidable squad that doesn't require the very rare General Kenobi to prove super effective, especially if Yoda's Battle Meditation (Special) is at Level 8 Zeta as well. Unfortunately, however, this Jinn / Yoda pairing is one of very, very few options for a powerful Jedi squad. Generally speaking, Jedi don't particularly synergize well with one another, at least compared to newer Hero squads like those Phoenix folks, which makes little sense to me.
Jedi in GoH were developed upon the premise of group healing and defense, while, on the other hand, Sith were developed upon the premise of individual health stealing and offense. The reasons for this are obvious, of course, and this traditional logic falls squarely in line with other Star Wars games, in fact. So, rather than suggest the reinvention of this logic, I've come up with a few ideas for a Jedi rework. These old model Jedi are fairly meh when compared to newer Heroes, such as Chirrut Imwe, Ahsoka Tano (Fulcrum), and even the often overlooked Sith Assassin. Here are three useful rework suggestions for any given Jedi taken from the Heroes I list above. As you'll note, current Jedi abilities at Level 8 tend to pale in comparison:
1. Chirrut Imwe
As the Force Wills (Special): All allies have their current Health percentages equalized. Dispel all debuffs from all allies and grant them a Heal Over Time effect for 4 turns for each effect dispelled. Allies that were not debuffed gain Tenacity Up for 3 turns.
2. Ahsoka Tano (Fulcrum)
Balanced Strike (Basic): Gain Protection Up (40%) for 2 turns, and grant Protection Up (40%) to a random ally that doesn't have it for 2 turns.
3. Sith AssassinAll of these abilities are generally defensive in nature, and granting versions of these abilities to reworked Jedi would begin to balance the scales. As a Healer, Barriss Offee would do well with a version of Fulcrum's Balanced Strike, for example. Another Healer, the infamously useless Jedi Consular, would do well with a version of Sith Assassin's Dark Shroud, especially if he could dispel all debuffs from all allies, rather than just himself. The lovable but also generally inept Plo Koon would do well with a version of Chirrut's As the Force Wills, especially if combined in some form with his current Take Charge (Special) ability.
Dark Shroud (Special): Dispel all debuffs from Sith Assassin and gain Stealth and Foresight for 2 turns. If she already had Stealth, gain Speed Up and Tenacity Up for 2 turns. Sith Allies gain 12% Turn Meter for each buff on her.
There is, of course, the offensive side of the sad Jedi story to consider. Most Jedi don't hit very hard, at least when compared to Rebels like Wedge Antilles or Princess Leia. The newer Jedi who are also Phoenix, such as Ezra Bridger, also significantly overshadow the damage done by a comparably leveled and modded Jedi. Granted, Bridger's ability to not only Attack Again, but also to stack his Offense up to 40% makes him a beast. But shouldn't Kit Fisto, for example, hit approximately as hard? Even Ginny McGinface could use a little bump.
But perhaps not, folks. Thinking creatively along the logic already outlined by GoH, why not add Jedi synergies across the board for calling Jedi allies to Assist with Basic Attacks, along the lines of Qui-Gon's Harmonious Assault (Special) ability? If, by default, every Jedi had a 25% chance to Assist an attacking Jedi ally, plus a 5% chance for each buff, suddenly a Jedi squad becomes potentially deadly. Or, in a different way, a rework of Ima-Gun Di's Jedi Strategist (Leader) ability could make for a formidable squad. Here it is as it stands now at Level 8:
All allies gain 30 Defense and Jedi allies gain 35% Counter Chance and 25% Counter Damage.Compare this to Commander Luke Skywalker's Rebel Maneuvers (Leader) ability at the same level:
Rebel allies have +50% Counter Chance, +50% Defense, and +50% Offense. Whenever an enemy Resists a detrimental effect, Rebel allies gain 5% Turn Meter.Say what now? I realize this Skywalker is a rare hero and, thus, there should be incentives for players to invest in the character. But, c'mon. Comparatively, the Jedi are getting the proverbial shaft here, especially considering that even an old school Rebel squad (Wedge, Biggs, Leia, Ackbar, and Stormtrooper Han) can make relatively quick work of an equally leveled Jedi squad. Swap Stormtrooper Han for Commander Luke Skywalker, then put Luke in as Leader, and these old school Rebels would mop the floor with just about any Jedi squad I could field.
So, in terms of Offense, why not rework a Hero like Ima-Gun Di? If I had my way, his Jedi Strategist (Leader) ability would read:
At the start of each encounter all allies gain Defense Up for 3 turns, and all Jedi allies gain Protection Up (25%) for 3 turns. Jedi allies have +50% Counter Chance, +5% for each buff. Jedi allies also have +25% Offense.I don't know about you, but this sounds like a great leader ability to me, one which actually draws inspiration from Cassian Andor's Groundwork (Unique). By itself such a reworked leader ability begins to level the playing field when it comes to Jedi squads. It also allows me, as a player, some flexibility. Right now, if I want a truly effective Jedi squad, then I pretty much have to use Qui-Gon with his Leader ability at Level 8 Zeta.
So what do you think? Do Jedi deserve a rework? Let me know in the comments below! And for my next post, I'll give an example of a fully reworked Jedi. Which one, you ask? Well, I've picked arguably the most useless Jedi around, Eeth Koth. Truth be told, his obvious ineptitudes actually make the job of reworking him much simpler! And trust me, when I'm done with Koth, he'll be a well-balanced, usefully effective member of any squad.
TB Update
Good job everyone! Let's focus our efforts on Phase 5 Forward Trenches & Airspace, at least for now. More soon!
Thursday, September 14, 2017
TB Update
Phase 4 is here, but there's still a battle to be won in Phase 3. Let's focus our efforts on the Phase 3 Power Generator before hitting the Phase 4 Forward Trenches! I've already deployed all my troops at the Power Generator, and we're not far off from earning a star.
Wednesday, September 13, 2017
TB Update
We've broken through the Rear Trenches! That means we now need to focus ALL troop deployments on the Power Generator for the rest of Phase 3. I repeat, deploy troops ONLY to the Power Generator for the rest of Phase 3.
Of course, it's open season on the Rear Airspace grid. Hit this hard too. Good going, everyone!
Of course, it's open season on the Rear Airspace grid. Hit this hard too. Good going, everyone!
Blast the Police
Just a reminder that today's daily event is the Credit Heist! Round up your criminals and do your worst!
 |
| Poor Dengar, he's always the first to get blasted. Aaaaand he hits back like a wet sock. |
TB Update
So, the battle will move forward to Phase 3 shortly. As you can see, we now have 3 map grids with which to contend. The northernmost grid, Rear Airspace, utilizes your Fleet. That leaves 2 grids for troop deployments. Here's what I'm thinking...
***A general rule of strategic thumb for engagement: Deploy all your troops to the northern grid if we have yet to earn a star. If we have earned a star, then deploy all your troops to the southern grid. In the case of this current Hoth TB, Phase 3, the northern grid contains the Rear Trenches and the southern grid contains the Power Generator.
This way, we're always moving top down. More importantly, we stand to earn Territory Points most efficiently with this strategy.
For example, if you were to deploy your troops and run battle missions on a grid that already has a star AND we never earn enough as a group for that second star, then all the Territory Points you will have earned would be essentially for nothing. That second star is tough to earn at the moment.
The idea here is simple. The more stars we earn working as a group, the better the rewards for everyone!
Good hunting.
***A general rule of strategic thumb for engagement: Deploy all your troops to the northern grid if we have yet to earn a star. If we have earned a star, then deploy all your troops to the southern grid. In the case of this current Hoth TB, Phase 3, the northern grid contains the Rear Trenches and the southern grid contains the Power Generator.
For example, if you were to deploy your troops and run battle missions on a grid that already has a star AND we never earn enough as a group for that second star, then all the Territory Points you will have earned would be essentially for nothing. That second star is tough to earn at the moment.
The idea here is simple. The more stars we earn working as a group, the better the rewards for everyone!
Good hunting.
Tuesday, September 12, 2017
Reinforcements
I thought I should let all of you know that I've been in contact with an old friend, Ryer Grogan, the guild leader of Alien Nation. A couple of you might recall that Ryer was once a member of Heroes Errant and, interestingly, also a member of our SWU cartel near the end of the game. Ryer contacted me with the idea that his GoH guild and ours merge. Now that I'm no longer under the threat of being blown away by hurricane Irma, we've started hammering out details.
The short story is that he's working now to have his players join us, specifically after this TB has ended. That'll give us all enough time to get acclimated before hitting the next TB full force. I couldn't be happier. Ryer is a prince and I'm certain his troops are great, too! And, if you happen to currently be an Alien Nation member who is reading this, you are very welcome to drop me a line.
When more details emerge, I'll let everyone know. Until then, good hunting!
TB Update
Now that we've secured a star on the northern front: If you have yet to engage in Phase 2, then focus ALL efforts on Overlook, which is the southern front!
TB Update
Hello all. Just a quick update on the current TB. Let's focus our initial attention on the Phase 2 Ion Cannon. I'm thinking that, if we coordinate our power on the north of the map, we stand a better chance to earn as many stars as possible while pushing as deeply as possible.
Let's see how this Phase turns out. Perhaps in the next Phase we'll switch tactics.
Good hunting!
Let's see how this Phase turns out. Perhaps in the next Phase we'll switch tactics.
Good hunting!
Monday, September 11, 2017
Imperial Invasion TB
Well, the time has arrived. The new TB is here, as many of you are already aware. I hadn't realized that it was going to be Hoth again, but I appreciate it, considering that we've seen this map before and we somewhat know what to expect. Now that we're well on our way to securing a second star on Phase 1, I thought to share some thoughts on how we could move forward.
From the last TB, we saw that rewards were given out according to star count. The higher the total count earned, the greater the rewards. This tells me that moving deep into the map is less important than securing star counts on the initial phases. It's also easier to do so. Take a look:

You'll notice that the Ion Cannon grid in the upcoming Phase 2 maxes out at 1,900,000 Territory Points to earn at least one star. This is true for all the map grids in this phase. And these initial TP numbers increase with the phases. For example, the initial TP for at least one star on the Phase 3 grids increase to 3,510,000, Phase 4 to 5,220,00, and so forth. This leads to an interesting question:
Do we spread ourselves thin, across battle grids for each respective Phase until we stall? Or, do we focus all our power on one grid per phase to earn as many stars as possible, then move on to the next grid in that phase and do the same, time permitting? The deeper we travel into the map, the harder it is to secure just that first star.
Answering this question will begin to define a general strategy for us moving forward. And, as I mentioned in a previous post, I'd like to hear your thoughts. What do you think about how we should most effectively progress through the map? Feel free to email, or simply respond in the comment box below. Thanks, everyone. And good hunting.
Saturday, September 9, 2017
Some Like It Hoth
Hi all. Just a friendly reminder that the next Territory Battle starts in a little less than two days. Looks like Hoth again. The Hero Units required for some of the Hoth missions look the same, too. I don't know about you, but I've some work to do on both my Hoth Rebel Soldier and my Hoth Rebel Scout! More soon.
Wednesday, September 6, 2017
Incoming!
In case you missed it, there's a new Marquee Event that starts soon:
I checked out these two new Heroes in the Character Inventory and, wow, they look nasty when used together -- even more so than, say, K-2SO and Cassian Andor, a pair I use regularly in GW.
And, I gotta say, EA must REALLY love Han Solo. How many Solo Heroes are there now? Four in total? Not to knock the thief with a heart of gold, since he's always been one of my favorite Star Wars characters, but there are SO MANY others EA could develop. Sigh. On that note, we really should start taking bets on how long it will take for Snoke to become available.
Anyway, have fun with this event! May the force be with you.
 |
| Dammit, K-Ren killed my Solo! |
And, I gotta say, EA must REALLY love Han Solo. How many Solo Heroes are there now? Four in total? Not to knock the thief with a heart of gold, since he's always been one of my favorite Star Wars characters, but there are SO MANY others EA could develop. Sigh. On that note, we really should start taking bets on how long it will take for Snoke to become available.
Anyway, have fun with this event! May the force be with you.
All's Well That Ends at the Guild Events Store
Well, I for one have high hopes about future Territory Battles. Given our fairly thin ranks, I thought we did very well. And the Events Store has plenty of useful goodies to chose from, including the new Hermit Yoda who, by the way, looks fantastic on paper. We'll have to wait and see just how effective the little guy is in battle!
As I mentioned in my original post, I'd like for us all to devise a kind of general strategy for Territory Battles. I have my ideas. And I'm hoping that you do, too. In fact, I'd like to hear them. Email me with any thoughts you have on devising a general strategy! Moreover, how did you approach this first Hoth TB? Did you deploy troops first? Platoons first? How did you pick your squads for the battles proper? Let me know and I'll share with the group.
On that note, I may be away from the game for a bit, unfortunately. At the moment, hurricane Irma is bearing down on Florida, and I'm with my family helping out. I have no idea how bad this storm is going to be, but, frankly, it doesn't look particularly hopeful at the moment. My fingers are crossed.
Good hunting, everyone.
Tuesday, September 5, 2017
Update: Hoth Territory Battle
As you know, we're in the middle of our first Territory Battle. So, what better time to begin with the updates in real time!
I just secured our first star on the Outer Pass, ensuring that we'll move forward on that front. We have yet to secure a star on the Forward Trenches, however.
Moving forward, let's all focus our maximum effort on these Forward Trenches. Working together, we'll push through much more quickly.
And, of course, don't forget the Contested Airspace. I, for one, am having fun with these!
Good hunting.
Sunday, September 3, 2017
Here We Go Again
To a handful of players in our guild, having a blog as a resource for a mobile Star Wars game is nothing new. Before the game's untimely demise, I developed two different blogs for cartels in Star Wars: Uprising, and I hope that this current blog for our Heroes Errant guild in GoH will prove just as fun and useful as they did.
My plan for the blog is fairly straightforward. First and foremost, I'll post on the new Territory Battles. As this forum info page suggests, group tactics are necessary for sustained success. EA Support recently informed me that they have no plans to make Guild Chat more functional, so the use of a blog for Territory Battle info and updates in real time makes sense to me. Once we stumblingly grind through the first one and see their scope firsthand, I'm sure we can develop a useful general strategy and, more importantly, a range of tactics we can apply on the fly to different battles and phases.
As I mentioned in Guild Chat, I've been very lazy about kicking inactive players. I plan to clean house after I finish this post. This means, though, that the real thinness of our ranks is about to become devastatingly obvious. However, I also plan to use this blog as a recruitment tool. As a cartel leader in SWU, I spent hours every day on recruitment, which entailed searching through lower-level cartels for promising players and then DMing them a pitch. Obviously, this is impossible to do in GoH. In this game, the general recruitment strategy for guilds isn't much of a strategy at all, but we'll get into the specifics later. For now, hang tight. I'll outline the plan in a future post.
Also, I'd like to discuss the pros and cons of different Heroes. Perhaps I can even devise some sort of rating system. But I do think that discussing not just the specifics of different Heroes, but also how they can be used to excellent effect with a squad will prove interesting and useful to everyone. The GoH developers sure do love their synergies! Additionally, I plan to discuss Mods, a very important aspect of the game that can significantly boost a given Hero's effectiveness. What's more, there's always Squad Arena and Galactic War tactics to consider, as well as the development of both Dark Side and Light Side Fleets.
And so on! There are many facets to GoH, and I'm looking forward to discussing them in the future. For now, this is a good start. More soon, everyone.
Subscribe to:
Posts (Atom)